Pinpoint Test D: Latch Mounted Door Ajar Switch Test
| TEST CONDITIONS | DETAILS/RESULTS/ACTIONS |
| D1: TEST 4 DOOR LATCH | |
|
NOTE:
If a customer is complaining of issues relating to a door ajar signal e.g. door latch won't lock, or alarm system triggering (indicated via DTC's), there may be several components that generate the fault, including
|
|
|
NOTE:
To investigate the functioning of the door ajar switch contained within the door latch, to prove or eliminate the door latch mounted door ajar switch as the root cause, follow the process below. This will prevent the unnecessary replacement of a correctly functioning door latch
|
|
| 1 Remove door trim from door REFER to: Front Door Trim Panel / Rear Door Trim Panel . | |
| 2 Disconnect door harness from latch for access to connector pins for latch electrical testing | |
| 3 Inspect latch module for any visual damage | |
|
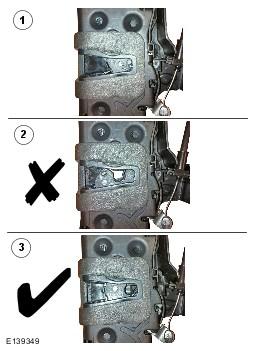
NOTE:
Figure 1 - Unlatched position shown
NOTE:
Figure 2 - First safety latched position shown
NOTE:
Figure 3 - Fully latched position shown
NOTE:
Test will not work if latch is only in first safety latch position 4
Using a small screw driver or similar, rotate latch claw to the second fully latched position (figure 3) |
|
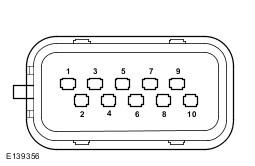
| 5 Carry out continuity test between terminals 1 and 4 (left side) or 8 and 4 (right side) with claw closed | |
| Does the continuity test pass? Yes The latch ajar switch is working correctly. Do not replace latch. Investigate for fault elsewhere in vehicle system No Release latch claw and repeat test from step 4 to confirm result. If this is a repeat test and you are sure that the ajar switch does not provide continuity when fully latched. Replace the latch. If replacing latch as part of a warranty claim, please quote reference code AJARINOP in the technician comments section of the warranty claim |
|