Lower Arm Ball Joint: Installation
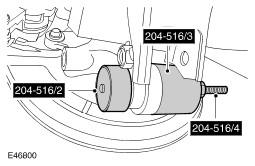
- Using the special tool, install the lower arm ball joint.
- Install the snap ring.
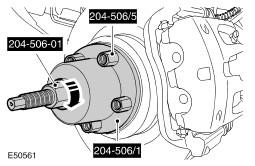
- Using the special tools, install the halfshaft in the wheel hub.
- Connect the lower arm to the wheel knuckle.
- Tighten the bolt to 175 Nm (129 lb.ft).
- Install a new halfshaft retaining nut and lightly tighten.
- Secure the parking brake cable.
- Connect the toe link.
- Tighten the bolt to 175 Nm (129 lb.ft).
- Mark the bolt head with a center punch, to indicate the number of times it has been used.
- Tighten the halfshaft retaining nut to 350 Nm (258 lb.ft).
- Stake the nut to the halfshaft.
- Install the wheel and tire.
- Carry out the wheel alignment procedure.
CAUTION:
If the push in force is less than 17 kN the wheel knuckle must be replaced.
CAUTION:
Make sure the ball joint is installed from the chamfered side of the wheel knuckle.
CAUTION:
Ensure the ball joint seal is not damaged. A damaged seal will lead to the premature failure of the joint.
CAUTION:
Do not use a bolt that has been installed more than 5 times. Check the bolt head for center punch marks. A bolt head with 4 center punch marks indicates the bolt has been installed 5 times and must be replaced.