Fuel Pump Camshaft Timing Check: Check
- Disconnect the battery ground cable.
Refer to: SPECIFICATIONS
- Raise and support the vehicle.
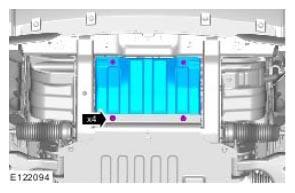
- Refer to: ENGINE UNDERSHIELD
- See Figure
- See figure
- See Figure
- See figure
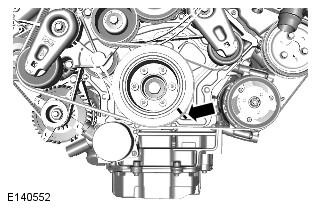
- Using a suitable marker, mark the position of the crankshaft pulley as illustrated.
- See figrue
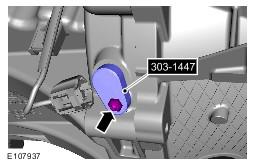
- Remove the Special Tool(s): 303-1447
- If required, carefully adjust the crankshaft position to allow correct installation of the special tool.
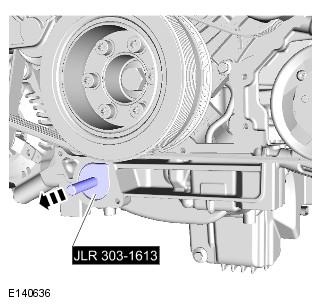
Install the Special Tool(s): JLR-303-1613
-
- If required, carefully adjust the crankshaft position to allow correct installation of the special tool.
- If the crankshaft timing tool cannot be installed, adjustment of the fuel pump camshaft timing will be required.
Install the Special Tool(s): 303-1447
Refer to: FUEL PUMP CAMSHAFT TIMING ADJUSTMENT
- Remove the Special Tool(s): JLR-303-1613
- Torque: 12 Nm
- Remove the Special Tool(s): 303-1447
- Torque: 10 Nm
- Torque: 24 Nm
- Connect the battery ground cable.
Refer to: SPECIFICATIONS
-
- Fill the engine with oil - for filling values on vehicles without supercharger:
Refer to: SPECIFICATIONS
- Clean any residual engine oil from the oil filler cap area.
- Fill the engine with oil - for filling values on vehicles without supercharger:
- Follow the Steps 22-28 before starting the engine.
-
- Start the engine and allow to run for 10 minutes, stop the engine.
- Check for leaks.
-
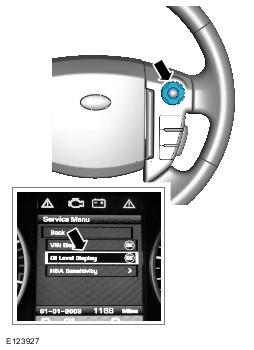
- Turn the ignition on.
-
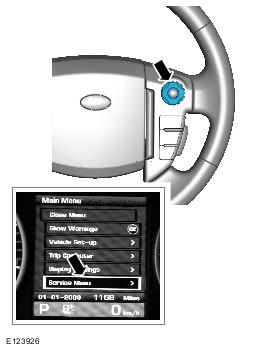
- The message center display will revert to the normal display in the trip computer.
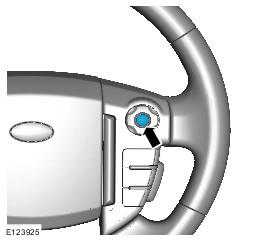
- Press the right-hand OK button and follow the instructions.
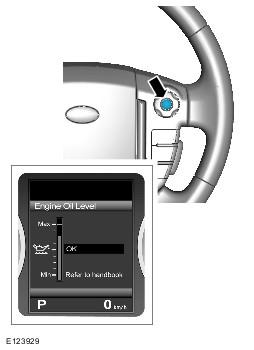
- Check that the oil level display shows an oil level reading.
- Only after having started and run the engine for 10 minutes (as indicated in Step 21), switch off the engine, then stabilizing for 10 minutes, take a reading from the oil level display and, if necessary top up with engine oil.
- Turn the ignition off.
- Allow 10 minutes for the engine oil level to stabilize if there has been additional oil top up.
-
- The message center display will revert to the normal display in the trip computer.
- Turn the ignition off.
- Turn the ignition on.
- Refer to: ENGINE UNDERSHIELD
- Torque: 10 Nm
WARNING:
Do not work on or under a vehicle supported only by a jack. Always support the vehicle on safety stands.
CAUTION:
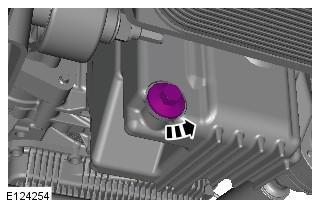
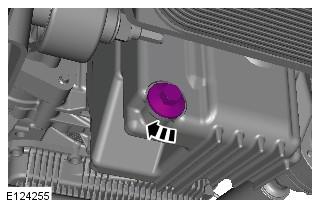
Be prepared to collect escaping oil.
NOTE:
Discard the sealing washer.
NOTE:
Collect the engine oil in a clean container.

CAUTION:
Only rotate the crankshaft clockwise.
CAUTION:
Make sure that the crankshaft is fully locked.
Install the Special Tool(s): 303-1447
NOTE:
Discard the seal.


CAUTION:
Do not use excessive force when adjusting the crankshaft position.
NOTE:
If the crankshaft timing tool cannot be installed, adjustment of the fuel pump camshaft timing will be required.
NOTE:
Install a new seal.
NOTE:
Install a new sealing washer.
CAUTION:
Make sure that the vehicle is left for 5 minutes from filling with oil and that the engine oil level is reading at least minimum (by following Steps 22-28), before starting the engine.
CAUTION:
Make sure that the vehicle has been left for 5 minutes from filling with oil.
CAUTION:
Make sure that the selector lever and the gearshift mechanism are in the park (P) position.
CAUTION:
Make sure that the hood is open.

NOTE:
If instructed to follow Steps 22-28 in a previous step, return to Step 21 and continue the procedure.
NOTE:
The following steps are to update the average oil level value.