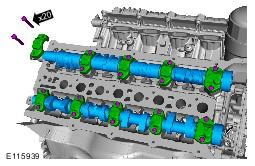
Camshaft RH: Installation
- Torque: 3 Nm
- Torque: 12 Nm
- Rotate the crankshaft untill the camshaft lobe on the valve being checked is 180 degrees from the maximum opening position.
- Using feeler gauge check the gap between the tappet and the camshaft lobe and check against specifications table.
- Remove the tappet and measure the thickness.
- Install a new tappet if required.
- Using feeler gauge check the gap between the tappet and the camshaft lobe and check against specifications table.
- Refer to: TIMING DRIVE COMPONENTS .
- Refer to SPECIFICATIONS information.
CAUTION:
Prior to installing the camshafts, position the crankshaft 45 degrees ATDC cylinder 1A to prevent valve/piston collision.
CAUTION:
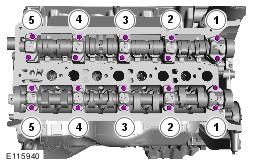
Make sure that the camshafts and camshaft bearing caps are installed in their original locations.
CAUTION:
Evenly and progressively install and tighten the camshaft bearing caps.
NOTE:
Lubricate the camshafts and the camshaft bearing caps with EP90 oil (or 75/90 viscosity oil will suffice) prior to installation.
NOTE:
Tighten the bolts in the indicated sequence.
CAUTION:
Only rotate the crankshaft clockwise.
NOTE:
If the valve clearance is incorrect, continue to the next step. If the valve clearance is correct, continue to step 8.
NOTE:
On vehicles without supercharger the inlet camshaft valve clearances cannot be checked.
CAUTION:
Use the following formula to calculate the required bucket thickness. Original thickness + measured clearance - desired clearance = required bucket thickness.
CAUTION:
Do not use a magnet to remove the tappet.
NOTE:
If a new tappet is installed then go back to step 1 of the install procedure.