Alarm False Activation/'Hood OPEN' Message Displayed On Instrument Cluster (LTB00626NAS2)
WARNING: This page is about the LR4 Base, which is a different variant/trim than selected.
Publication date: 2015-06-16Reference number: LTB00626NAS2
Supersedes refnos: LTB00626NAS1
ALARM FALSE ACTIVATION/'HOOD OPEN' MESSAGE DISPLAYED ON INSTRUMENT CLUSTER
TECHNICAL SERVICE BULLETIN
Reference Number(s): LTB00626NAS2, Date of Issue:
June 16, 2015
| LAND ROVER: | 2008-2014 LR2 (LF); 2010 Onwards LR4 (LA); 2012-2014 Range Rover Evoque (LV); 2014 Onwards Range Rover Sport (LW); 2013 Onwards Range Rover (LG); 2010-2013 Range Rover Sport (LS) |
| SECTION: | 419-01A |
| AFFECTED VEHICLES: | LR2 (LF) Model Year: 2008-2014 VIN: 8H001002-EH429811; LR4 (LA) Model Year: 2010 Onwards VIN: AA510742 Onwards; Range Rover Evoque (LV) Model Year: 2012-2014 VIN: CH000447-EH975956; Range Rover Sport (LW) Model Year: 2014 Onwards VIN: EA000002 Onwards; Range Rover (LG) Model Year: 2013 Onwards VIN: DA001204 Onwards; Range Rover Sport (LS) Model Year: 2010-2013 VIN: AA212147-DA814822 |
NOTE:
This reissue replaces all previous versions. Please destroy all previous versions.
CONDITION SUMMARY
Situation: One or more of the following issues may be evident:
- The alarm is triggered for no apparent reason;
- The 'Hood Open' message is displayed on the Instrument Cluster; and/or
- A mislock sound is emitted when locking the vehicle.
Cause: These issues may be caused by a faulty hood open switch.
Action: Should the customer experience this concern, follow the appropriate Service Instruction (1 or 2) outlined below.
PARTS
PARTS
| LR054331 | Hood latch with integrated switch | Quantity: 1 |
TOOLS
No Tools Required
WARRANTY
NOTE:
Repair procedures are under constant review, and therefore times are subject to change; those quoted here must be taken as guidance only. Always refer to TOPIx to obtain the latest repair time.
NOTE:
DDW requires the use of causal part numbers. Labor only claims must show the causal part number with a quantity of zero.
| DESCRIPTION | SRO | TIME (HOURS) | CONDITION CODE | CAUSAL PART |
|---|---|---|---|---|
| Hood latch w/switch - Renew - LR2 (L359) | 86.77.20 | 0.9 | 42 | LR041431 |
| Hood latch w/switch - Renew - LR4 (L319) | 86.77.20 | 0.3 | 42 | LR041431 |
| Hood latch w/switch - Renew - Range Rover Evoque (L538) | 86.77.20 | 0.4 | 42 | LR041431 |
| Hood latch w/switch - Renew - Range Rover Sport (L494) | 86.77.20 | 0.3 | 42 | LR041431 |
| Hood latch w/switch - Renew - Range Rover Sport (L320) | 86.77.20 | 0.3 | 42 | LR041431 |
| Hood latch w/switch - Renew - Range Rover (L405) | 86.77.20 | 0.2 | 42 | LR041431 |
NOTE:
Normal Warranty procedures apply.
SERVICE INSTRUCTION 1
SERVICE INSTRUCTION '1' FOR ALL VEHICLES EXCEPT LR2 (L359)
NOTE:
some components shown removed for clarity.
- Refer to hood switch removal procedure (see TOPIx Workshop Manual, section 419-01A).
- When switch is removed, disconnect the release cable and remove the hood latch.
- To install, reverse the removal procedure aligning the latch as follows.
- Loosen the two hood latch bolts.
- Lower the hood and check for alignment.
- Open the hood and tighten the bolts to 10Nm (7lbf ft).
- Check the operation of the hood safety latch.
- If necessary, repeat the above adjustment procedure.
SERVICE INSTRUCTION 2
SERVICE INSTRUCTION '2' FOR LR2 (L359) VEHICLES ONLY
NOTE:
some components shown removed for clarity.
- Remove the front bumper cover (see TOPIx Workshop Manual, section 50119).
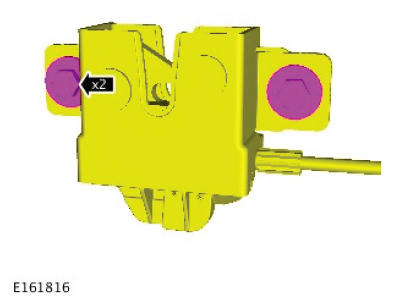
- Remove the two fixing bolts and move the latch aside.
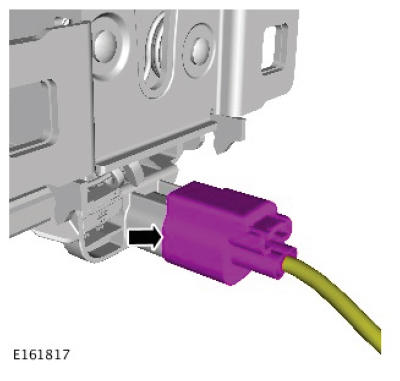
- Disconnect the electrical connector on the hood switch.
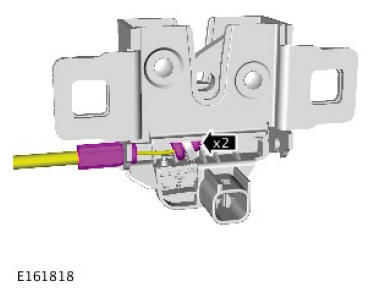
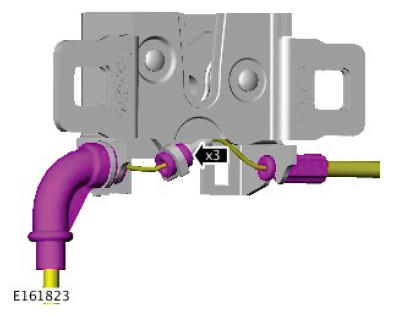
- Disconnect the cable and remove the hood latch.
- To install, reverse the removal procedure aligning the latch as follows.
- Loosen the two hood latch bolts.
- Lower the hood and check for alignment.
- Open the hood and tighten the bolts to 10Nm (7lbf ft).
- Check the operation of the hood safety latch.
- If necessary, repeat the above adjustment procedure.