Addition Of Protective SLEEVING To The Front And Rear Bumper Harnesses (LTB00660V2)
WARNING: This page is about the LR4 Base, which is a different variant/trim than selected.
Publication date: 2014-09-12Reference number: LTB00660V2
Supersedes refnos: LTB00660NAS1
ADDITION OF PROTECTIVE SLEEVING TO THE FRONT AND REAR BUMPER HARNESSES
TECHNICAL SERVICE BULLETIN
Reference Number(s): LTB00660v2, Date of Issue:
September 12, 2014
Superceded Bulletin(s): LTB00660/2014, Date of Issue:
May 07, 2014
| LAND ROVER: | 2010-2013 Discovery 4/LR4 (LA), Range Rover Sport (LS); 2012 Onwards Range Rover Evoque (LV), Freelander 2/LR2 (LF); 2007 Onwards Freelander 2/LR2 (LF); 2011 Onwards Range Rover (LG); 2014 Onwards Range Rover Sport (LW); 2010-2012 Range Rover (LM) |
| SECTION: | 418-00 |
| AFFECTED VEHICLES: | Discovery 4/LR4 (LA) Model Year: 2010-2013 VIN: AA510178-DA664194; Range Rover Sport (LS) Model Year: 2010-2013 VIN: AA215623-DA790203; Range Rover Evoque (LV) Model Year: 2012 Onwards VIN: CH600000 Onwards; Freelander 2/LR2 (LF) Model Year: 2007 Onwards VIN: 7H001002 Onwards; Range Rover (LG) Model Year: 2011 Onwards VIN: DA000001 Onwards; Range Rover Sport (LW) Model Year: 2014 Onwards VIN: EA300000 Onwards; Range Rover (LM) Model Year: 2010-2012 VIN: AA302697-CA393639; Freelander 2/LR2 (LF) Model Year: 2012 Onwards VIN: CL910001 Onwards |
NOTE:
This reissue replaces all previous versions. Please destroy all previous versions. Only refer to the electronic version of this Technical Bulletin in TOPIx.
NOTE:
This bulletin supersedes TSB LTB00660/2014 dated 07 MAY 2014, which should either be destroyed or clearly marked to show it is no longer valid (e.g. with a line across the page). Only refer to the electronic version of this Technical Bulletin in TOPIx.
MARKETS
All
CONDITION SUMMARY
Situation: A customer may report a concern that the front and/or rear parking aid sensors are inoperative.
This version has been issued for a change to the Affected Vehicle Range, Parts Required and Warranty Table.
Cause: Front or rear bumper harness damaged and/or corroded. Suggested Customer Concern Code A88.
Action: Should a customer express concern, follow the Service instruction outlined below.
PARTS
NOTE:
Due to the length of the wiring harness on the Range Rover Evoque and Range Rover (LM) front bumpers, two front bumper sleeving kits will be required.
PARTS
| LR060969 | Evoque - Range Rover (LM) - Front bumper sleeving kit | Quantity: 2 |
| LR060969 | Front bumper sleeving kit | Quantity: 1 |
| LR060970 | Rear bumper sleeving kit | Quantity: 1 |
TOOLS
No Tools Required
WARRANTY
NOTE:
Range Rover (LG) rear bumper harness is fully protected and does not require modification.
NOTE:
Repair procedures are under constant review, and therefore times are subject to change; those quoted here must be taken as guidance only. Always refer to TOPIx to obtain the latest repair time.
NOTE:
DDW requires the use of causal part numbers. Labor only claims must show the causal part number with a quantity of zero.
| DESCRIPTION | SRO | TIME (HOURS) | CONDITION CODE | CAUSAL PART |
|---|---|---|---|---|
| Range Rover (LM) front bumper - Install protection to front bumper harness | 86.71.89.53 | 1.4 | 42 | LR031084 |
| Range Rover (LM) rear bumper Install protection to rear bumper harness | 86.71.89.54 | 0.8 | 42 | LR032271 |
| Range Rover Sport (LW) front bumper - Install protection to front bumper harness | 86.71.89.53 | 1.3 | 42 | LR058437 |
| Range Rover Sport (LW) rear bumper Install protection to rear bumper harness | 86.71.89.54 | 1.5 | 42 | LR053996 |
| Range Rover (LG) front bumper - Install protection to front bumper harness | 86.71.89.53 | 1.4 | 42 | LR053993 |
| Freelander 2/LR2 front bumper 2007 onwards - Install protection to front bumper harness | 86.71.89.53 | 1 | 42 | LR040145 |
| Freelander 2/LR2 front bumper 2011 onwards - Install protection to front bumper harness | 86.71.89.53 | 1.1 | 42 | LR040145 |
| Freelander 2/LR2 rear bumper Install protection to rear bumper harness | 86.71.89.54 | 1.2 | 42 | LR040105 |
| Range Rover Evoque front bumper upto 2013 - Install protection to front bumper harness | 86.71.89.53 | 1.9 | 42 | LR047488 |
| Range Rover Evoque front bumper 2014 onwards - Install protection to front bumper harness | 86.71.89.53 | 1.8 | 42 | LR047488 |
| Range Rover Evoque rear bumper Install protection to rear bumper harness | 86.71.89.54 | 1.2 | 42 | LR028309 |
| Discovery 4/LR4 front bumper - Install protection to front bumper harness | 86.71.89.53 | 1.3 | 42 | LR030234 |
| Discovery 4/LR4 rear bumper - Install protection to rear bumper harness | 86.71.89.54 | 1.1 | 42 | LR015500 |
| Range Rover Sport (LS) front bumper - Install protection to front bumper harness | 86.71.89.53 | 0.9 | 42 | LR030235 |
| Range Rover Sport (LS) rear bumper - Install protection to rear bumper harness | 86.71.89.54 | 0.8 | 42 | LR016237 |
NOTE:
Normal Warranty policies and procedures apply.
SERVICE INSTRUCTION
NOTE:
This bulletin is intended as a separate additional repair. If there are any corroded or damaged wires in the wiring harness, these should be repaired using the harness repair kit prior to this repair procedure. This should be carried out as a separate claim (see TOPIx Workshop Manual, section 418-02 for additional information on harness repair).
NOTE:
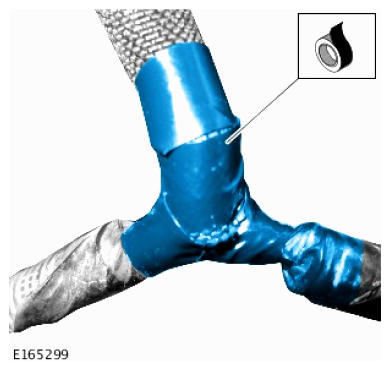
After the protective sleeving has been installed it must be spiral taped and not fully taped.
NOTE:
Some variation in the illustrations may occur, but the essential information is always correct.
Front Bumper Cover
- Remove the front bumper cover to expose the complete wiring harness (see TOPIx Workshop Manual Section 501-19 Front Bumper Cover).
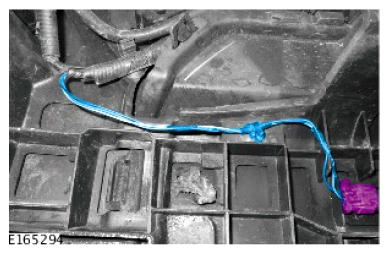
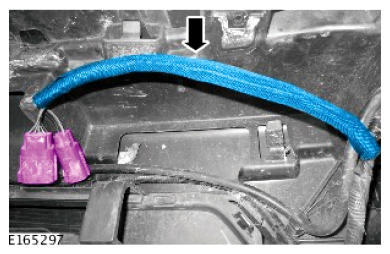
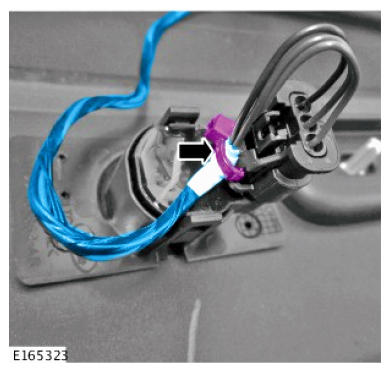
- Location of the front parking aid sensor wiring harness.NOTE: There must be a minimum of 30mm between the connector and the end of the bumper harness protective sleeving.NOTE: Repeat this procedure on the four parking aid sensors.
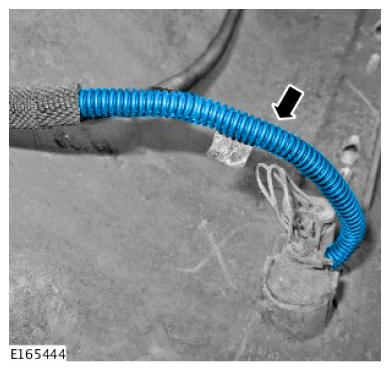
- Install the front bumper wiring harness protective sleeving to the front parking aid sensor harness on both sides of the securing clip.
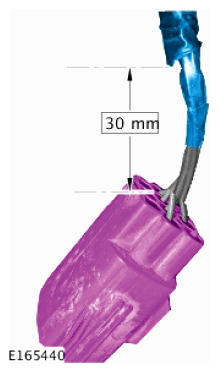
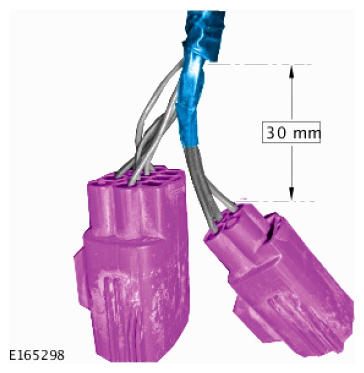
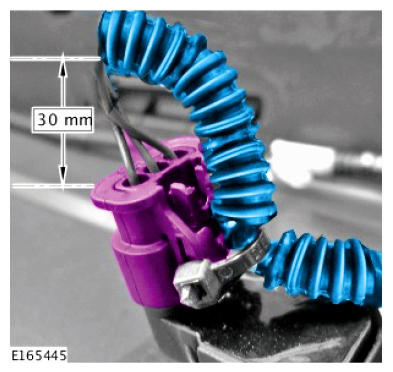
- There must be a minimum of 30mm between the electrical connector and the protective sleeving.NOTE: Make sure the protective sleeving is a minimum of 30mm from the electrical connector.NOTE: Repeat this procedure on the four front parking aid sensors.
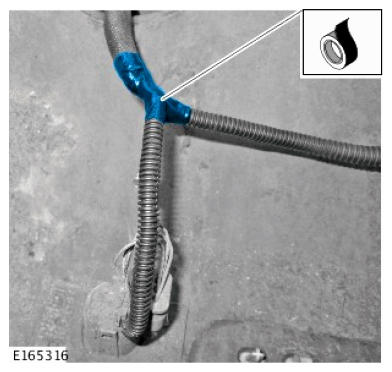
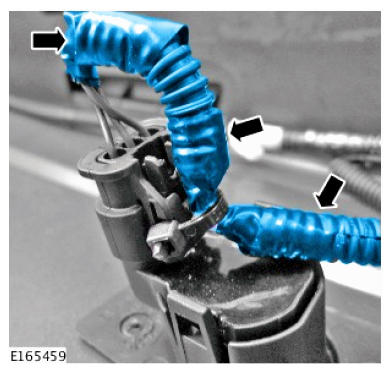
- Use suitable tape to secure the end of the protective sleeving to the front parking aid sensor wiring harness.NOTE: Repeat this procedure on all front bumper wiring harness joints where the protective sleeving is installed.NOTE: Repeat this procedure on the four front parking aid sensors.
- Use suitable tape to secure the end of the protective sleeving to the front parking aid sensor harness.
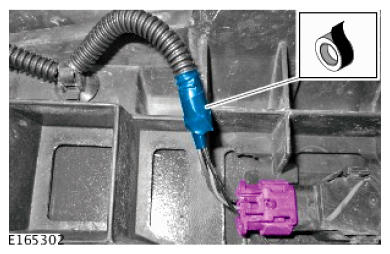
- Wrap the main connector wiring harness in the 4.5mm protective wrap.NOTE: There must be a minimum of 30mm between the electrical connector and the protective wrap.
- Use suitable tape to secure the protective wrap to the front parking aid sensor wiring harness.NOTE: Repeat this procedure on all bumper wiring harness joints.
- Use suitable tape to secure the end of the protective sleeving to the front parking aid sensor wiring harness.
- Install the front bumper cover (see TOPIx Workshop Manual Section 501-19 Front Bumper Cover).
Rear Bumper Cover
- Remove the rear bumper cover to expose the complete wiring harness. (see TOPIx Workshop Manual Section 501-19 Rear Bumper Cover).
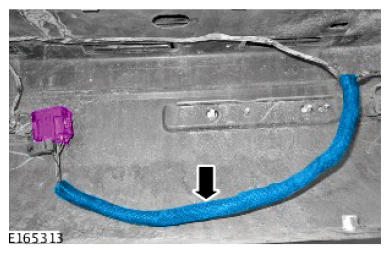
- Install the 4.5mm sleeving to the rear bumper wiring harness.NOTE: Repeat this procedure on all bumper wiring harness joints.
- Use suitable tape to secure the end of the protective sleeving to the rear parking aid sensor wiring harness.NOTE: There must be a minimum of 30mm between the electrical connector and the protective wrap.
- Use suitable tape to secure the protective wrap to the rear parking aid sensor wiring harness.NOTE: Repeat this procedure on the four rear parking aid sensors.
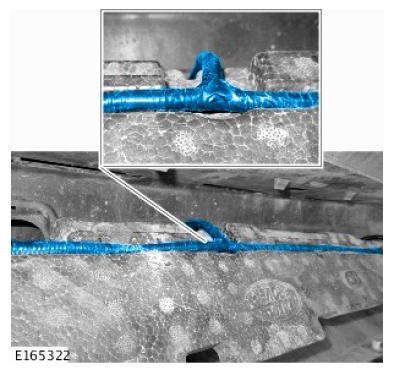
- Make sure the rear parking aid sensor wiring harness is located correctly on the cable tie.NOTE: Repeat this procedure on the four rear parking aid sensors.
- Install the protective sleeving on the rear parking aid sensor wiring harness.NOTE: Repeat this procedure on the four bumper sensors.NOTE: Make sure the protective sleeving is a minimum of 30mm from the electrical connector.
- Install the protective sleeving on the rear parking aid sensor wiring harness.NOTE: Repeat this procedure on the four rear parking aid sensors.
- Use suitable tape to secure the end of the protective sleeving to the rear parking aid sensor wiring harness.
- Secure the rear parking aid sensor wiring harness into the wiring harness channel.
- Install the rear bumper cover (see TOPIx Workshop Manual Section 501-19 Rear Bumper Cover).
- Check the operation of the front and rear parking aid sensors.