Rear Doors Difficult To Open (JLRTB02052V5)
Reference number: JLRTB02052V5
Supersedes refnos: JLRTB02052V2, JLRTB02052V3, JLRTB02052V4
REAR DOORS DIFFICULT TO OPEN
TECHNICAL SERVICE BULLETIN
| LAND ROVER: | All Models |
| SECTION: | 501-03 |
CONDITION SUMMARY
SITUATION:
When opening either of the rear doors, the door seal contacts the rear quarter window and makes opening the doors more difficult and sometimes noisy.
This technical bulletin has been updated due to changes to the affected vehicle range, addition of a Service Information Section and Service Instruction C.
CAUSE:
C-pillar exterior finisher trim to rear quarter window alignment incorrect.
Suggested customer concern code - AV3
ACTION:
Follow the instructions below.
PARTS
| PART NUMBER | DESCRIPTION | QUANTITY |
|---|---|---|
| LR132185 | C-Pillar finisher trim - Left | 1 |
| LR132182 | C-Pillar finisher trim - Right | 1 |
| ZZZ001 | 3M Double sided tape 4229P - 5 mm wide - 3 m roll(or equivalent) | 10.00 |
WARRANTY
- Repair procedures are under constant review, and therefore times are subject to change; those quoted here must be taken as guidance only. Use TOPIx to obtain the latest repair time.
- The JLR claims submission system requires the use of causal part numbers. Labor only claims must show the causal part number with a quantity of zero.
| DESCRIPTION | SRO | TIME (HOURS) | CONDITION CODE | CAUSAL PART |
|---|---|---|---|---|
| JLRTB02052 - Rear door alignment - Single | 99.01.21 | 0.2 | * | LR132185/LR132182 |
| JLRTB02052 - Rear door alignment - Pair | 99.01.22 | 0.3 | * | LR132185/LR132182 |
| JLRTB02052 - C-pillar finisher trim - Single | 99.01.23 | 0.1 | * | LR132185/LR132182 |
| JLRTB02052 - C-pillar finisher trim - Pair | 99.01.24 | 0.2 | * | LR132185/LR132182 |
| JLRTB02052 - Rear door seal modification - Single | 99.01.91 | 0.1 | * | LR132185/LR132182 |
| JLRTB02052 - Rear door seal modification - Pair | 99.01.92 | 0.2 | * | LR132185/LR132182 |
SERVICE INFORMATION
If the door seal is catching on the exterior trim panel, proceed to Service Instruction A.
If the margin seal is catching on the C-Pillar glass, complete Service Instruction C.
- Check the operation of the rear door(s).
- If the door is no longer difficult to open, do not continue with this technical bulletin.
- If the door is still difficult to open, complete Service Instruction A and Service Instruction B.
If the C-Pillar exterior trim is incorrectly installed, complete Service Instruction C.
- Check the operation of the rear door(s).
- If the door is no longer difficult to open, do not continue with this technical bulletin.
- If the door is still difficult to open, complete Service Instruction A and Service Instruction B.

SERVICE INSTRUCTION A - DOOR ALIGNMENT
-
NOTE: Only check the alignment of the rear doors that are difficult to open.
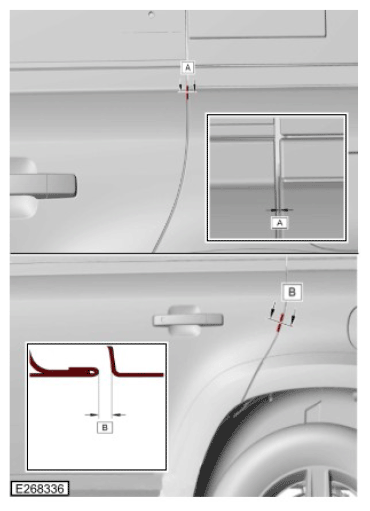
Check the alignment of the rear door(s) in the areas shown in the illustration.
SECTION DESCRIPTION GAP PROFILE A Rear door to rear quarter N/A 0.0 ± 0.5 mm B Rear door to rear quarter 3.5 ± 0.7 mm 0.0 ± 0.7 mm -
NOTE: Only adjust the rear doors that are either out of alignment tolerance or do not have a gap of 2.8 mm.
Adjust the rear door(s) to be as far rearward as possible while still being within tolerance, the gap must be 2.8 mm (see TOPIx Workshop Manual section 501-26: Body Repairs: Vehicle Specific Information and Tolerance Checks - General Procedures - Rear Door Alignment).
- Check the operation of the rear door(s).
- If the door is no longer difficult to open, do not continue with this technical bulletin.
- If the door is still difficult to open, continue to SERVICE INSTRUCTION B .
SERVICE INSTRUCTION B - DOOR SEAL MODIFICATION
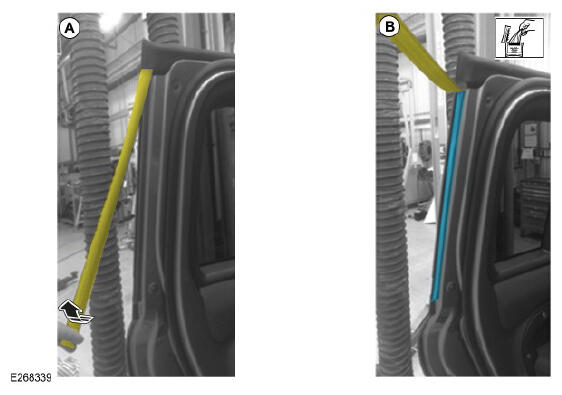
- Open the rear door that is difficult to open.
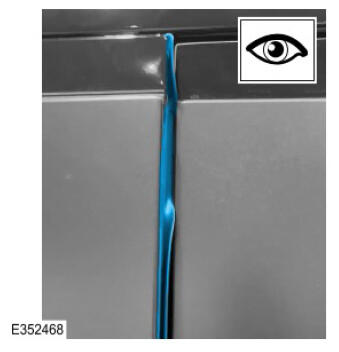
(A) Reposition the section of rear door seal shown in the illustration.
(B) Make sure the area highlighted in the illustration is clean, dry and free from contamination.
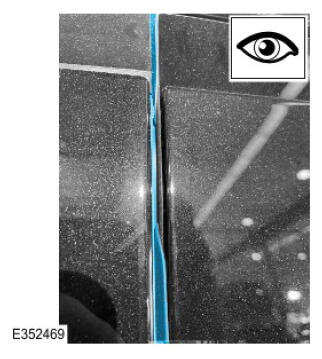
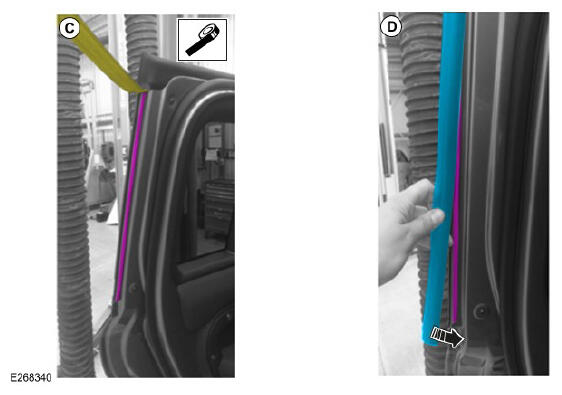
(C) Apply the double sided adhesive tape along the seal path on the door frame, as shown in illustration 'C' . Do not remove the protective backing from the double sided adhesive tape at this stage.
(D) Install the section of rear door seal removed during step 2.
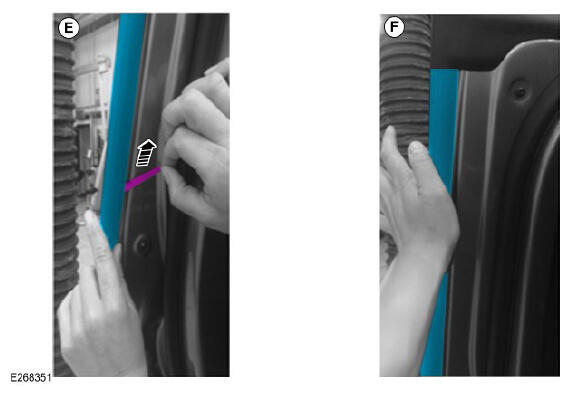
(E) With the rear door seal installed, remove the protective backing from the double sided adhesive tape.
(F) Apply firm pressure to the rear door seal to make sure it is adhered to the double sided adhesive tape.
- Repeat steps 1 to 4 for the other door, if required.
- Check the operation of the rear door(s).
- If the door is no longer difficult to open, do not continue with this technical bulletin.
- If the door is still difficult to open, continue to SERVICE INSTRUCTION C .
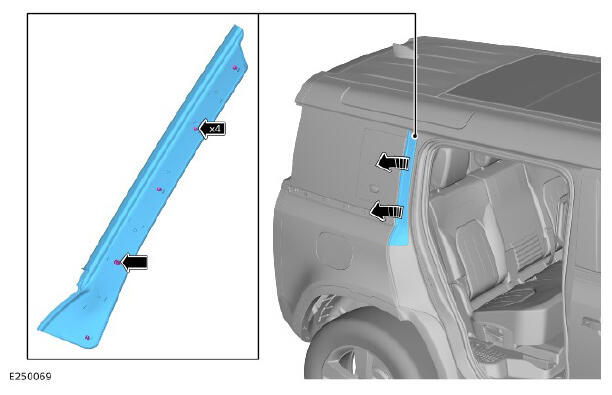
SERVICE INSTRUCTION C - RENEW C-PILLAR EXTERIOR FINISHER TRIM
- Open the rear door that is still difficult to open. 1.
Remove and discard the C-pillar exterior finisher trim.
- Clean the area behind the C-pillar exterior finisher trim.
Install the new C-pillar exterior finisher trim.
- Remove the adhesive tape backing.
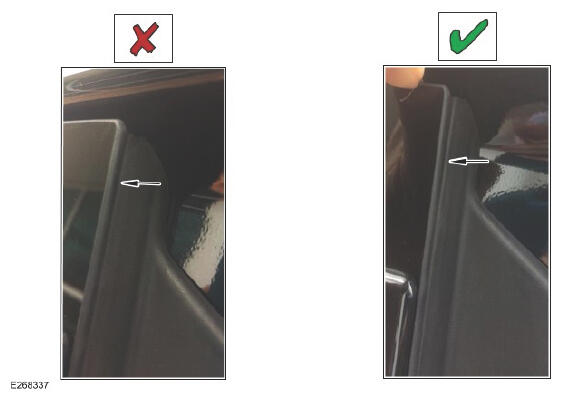
- Make sure the C-pillar exterior finisher trim protrudes 1-1.5 mm away from the rear quarter window, as shown in the illustration, before fully securing.
The image with the RED 'X' shows the C-pillar exterior finisher trim installed incorrectly behind the rear quarter window.
The image with the GREEN ' ' shows the C-pillar exterior finisher trim installed correctly with a 1-1.5 mm protrusion from the rear quarter window.
- Repeat steps 1 to 3 for the other 4. door, if required.