Screech Noise From EPB Actuator; Parking Brake Drum/Shoe Drag (LTB00079NAS4)
Reference number: LTB00079NAS4
SCREECH NOISE FROM EPB ACTUATOR; PARKING BRAKE DRUM/SHOE DRAG
TECHNICAL SERVICE BULLETIN
| JAGUAR: | 2005-2009 LR3 (LA); 2010-2016 LR4 (LA); 2005-2007 Range Rover Sport (LS); 2007-2011 Range Rover Sport (LS); 2011-2013 Range Rover Sport (LS) |
| SECTION: | 206-05: Parking Brake and Actuation |
AFFECTED VEHICLE RANGE
| MODEL: | MODEL YEAR: | VIN: | ASSEMBLY PLANT: |
|---|---|---|---|
| LR3 (LA) | 2005-2009 | 000303-513325 | Solihull |
| LR4 (LA) | 2010-2016 | 513326-847648 | Solihull |
| Range Rover Sport (LS) | 2005-2007 | 900129-999999 | Solihull |
| Range Rover Sport (LS) | 2007-2011 | 100000-299999 | Solihull |
| Range Rover Sport (LS) | 2011-2013 | 700000-814822 | Solihull |
MARKETS
NORTH AMERICA
CONDITION SUMMARY
SITUATION:
A screech noise from the rear brakes may be evident when the vehicle is moving or when applying the Electric Park Brake (EPB).
CAUSE:
This may be caused by corroded, worn, or incorrectly adjusted parking brake shoes, leading to excessive parking brake shoe wear and/or heat and noise. Additionally, the internal components of the EPB actuator may have over traveled and/or be jammed.
ACTION
Should a customer express this concern, refer to the Service Information and then follow the Diagnostic Procedure below.
PARTS
No Parts Required
TOOLS
| Jaguar Land Rover-approved Midtronics battery power supply | |
| Jaguar Land Rover-approved diagnostic tool with latest SDD Software Management Pack |
WARRANTY
- Repair procedures are under constant review, and therefore times are subject to change; those quoted here must be taken as guidance only. Always refer to JLR claims submission system to obtain the latest repair time.
- The JLR Claims Submission System requires the use of causal part numbers. Labor only claims must show the causal part number with a quantity of zero.
| DESCRIPTION | SRO | TIME (HOURS) | CONDITION CODE | CAUSAL PART |
|---|---|---|---|---|
| Service Electric Park Brake shoes - LR3 / LR4 (L319) | 70.35.89.38 | 1.5 | 42 | SFS500012 |
| Service Electric Park Brake shoes -Range Rover Sport (L320) | 70.35.89.38 | 1.8 | 42 | SFS500012 |
| Park brake actuator - Calibration | 70.90.10 | 0.2 | 42 | SFS500012 |
SERVICE INFORMATION
Screech noise on Electric Park Brake (EPB) operation (vehicle stationary) . If there is a screech noise when operating the EPB while the vehicle is stationary and/or the EPB lamp is illuminated with Diagnostic Trouble Code (DTCs) C1A43-00, C1A53-68, and/or C1A46-62 stored, go to Step 1 of the Diagnostic Procedure below.
Normal EPB operation correct with rubbing/screeching noise from the rear brakes when the vehicle is moving. If the EPB operates correctly but there is a rubbing/screech noise from the rear brakes with the vehicle in motion OR there is evidence of parking brake shoe drag (heat build up/excessive lining wear), go to Step 16 of the Diagnostic Procedure below.
DIAGNOSTIC PROCEDURE
UNJAM THE ELECTRIC PARK BRAKE (EPB) ACTUATOR
A Jaguar Land Rover-approved Midtronics battery power supply must be connected to the vehicle startup battery during diagnosis / module programming.
All ignition ON/OFF requests must be carried out. Failure to perform these steps may cause damage to control modules in the vehicle.
- Connect the Jaguar Land Rover-approved Midtronics battery power supply to the vehicle startup battery.
-
NOTE: The Jaguar Land Rover-approved diagnostic tool must be loaded with SDD152.03 Software Management Pack v288 (or later).
Connect the Jaguar Land Rover-approved diagnostic tool to the vehicle. - Begin a new diagnostic session.
- Follow all on-screen instructions, allowing the diagnostic tool to read the VIN, identify the vehicle, and initiating the data collect sequence.
- Select the Service Functions Session type.
-
NOTE: If the task completes successfully, the parking brake cables will be driven to the 'mount' position to unjam the EPB actuator. The parking brake at the wheel may still be jammed on due to brake drag.
Select Run to perform the 'Parking brake - Parking brake unjam' option.- Follow all on-screen instructions to complete this task.
- When all tasks are complete, go to the next Step.
ELECTRIC PARK BRAKE (EPB) ACTUATOR - FUNCTIONALITY TEST
NOTE: This procedure will determine if the Electric Park Brake (EPB) actuator is serviceable or if it is jammed/damaged beyond repair. -
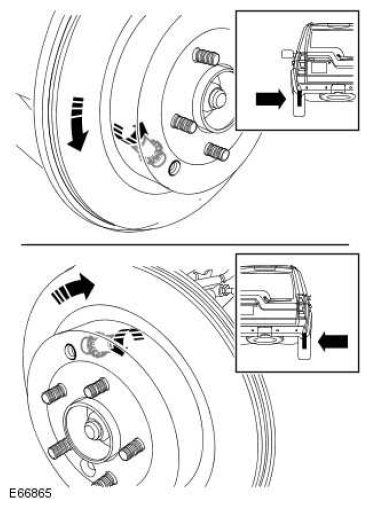
CAUTION: The direction of brake disc rotation must always be forwards.NOTE: Perform this step to both sides of the vehicle.
Wind the parking brake shoe adjusters out as far as they will go in order to lock the brake shoes against the brake drums, making it no longer possible to rotate the brake disc by hand.
- Start the engine and select transmission gear position Neutral (N) and transfer case Low (L) range.
- NOTE: Make sure the startup battery is in good condition.
Pull up the EPB switch and release it to apply the EPB.- With the assistance of another technician, listen to hear whether the EPB motor runs and for a 'screech' noise from the EPB module.
- Press the brake pedal and press down on the EPB switch.
- Pull up the EPB switch and release it to apply the EPB.
- With the assistance of another technician, listen to hear whether the EPB motor runs and for a 'screech' noise from the EPB module.
- If the EPB module motor could be heard to run during the apply with no 'screech' noise, go to Step 13.
- If the EPB module made a 'screech' noise during both applications or the second application, the EPB actuator is potentially jammed. Go to Step 12.
- With the assistance of another technician, listen to hear whether the EPB motor runs and for a 'screech' noise from the EPB module.
- Select Run
to perform the 'Parking brake - Parking brake unjam'
option 3 times.
- Test the EPB module as per Steps 9- 11.
- If a screech noise is still evident, replace the EPB module (see TOPIx Workshop Manual section 206-05: Parking Brake and Actuation - Removal and Installation - Parking Brake Actuator).
CHECK ELECTRIC PARK BRAKE (EPB) BRAKE FORCE SENSOR OUTPUT
- Test the EPB module as per Steps 9- 11.
- NOTE: Make sure the vehicle transfer case range is in Low (L) and the Electric Park Brake (EPB) is applied.
Check the EPB 'Brake Force Sensor' output.
- Select the Complete Vehicle - Data Logger tool.
- Select Brake Force Sensor and add to Data Logger.
- Run Data Logger and read Brake Force Sensor
output.
- Follow on-screen prompts, noting the Brake Force Sensor output.
- Exit Data Logger.
- If the 'Brake Force Sensor' output is greater than 1,000 N, the EPB Module is in correct working order.
- If the 'Brake Force Sensor' output is less than 1,000 N, the EPB module should be replaced.
- If the EPB module motor did not run, further diagnosis is required.
- Check for Diagnostic Trouble Codes (DTCs).
- Check the power supply to the EPB module and repair as necessary (see TOPIx Workshop Manual section 206-05: Parking Brake and Actuation - Diagnosis and Testing - parking brake).
- If a fault is found and repaired, check the EPB module as outlined in Step 12 after the repair is complete.
- Press the brake pedal and press down on the EPB switch.
- Back the brake shoe adjusters off.
- Once complete, go to Step 19.
CAUTION: A Jaguar Land Rover-approved Midtronics battery power supply must be connected to the vehicle startup battery during diagnosis / module programming.
All ignition ON/OFF requests must be carried out. Failure to perform these steps may cause damage to control modules in the vehicle. - Connect the Jaguar Land Rover-approved Midtronics battery power supply to the vehicle startup battery.
-
NOTE: The Jaguar Land Rover-approved diagnostic tool must be loaded with SDD152.03 Software Management Pack v288 (or later).
Connect the Jaguar Land Rover-approved diagnostic tool to the vehicle.
- Begin a new diagnostic session.
- Follow all on-screen instructions.
- Select the Service Functions Session type.
- Select Run
to perform the 'Parking brake - Drive the parking brake to the mounting position'
option.
- Follow all on-screen instructions to complete this task.
- When all tasks are complete, go to the next Step.
- Remove the EPB 30 Amp fuse 'LINK FL8' from the Battery Junction Box (BJB) to isolate the EPB electrical circuit.
- Remove the rear brake discs (see TOPIx Workshop Manual section: 206-04: Rear Disc Brake - Removal and installation - Brake Disc).
-
CAUTION: The brake shoe hold-down clips can become over-stressed during installation/maintenance. Care should be taken to not over-compress the hold-down clips during installation. Following installation, or during any other maintenance inspection, always check that the parking brake shoes are being held against the brake backing plate. When installing new parking brake shoes, always use the new hold-down clips provided. If installing used shoes and there is any doubt about the integrity of the hold-down clips, install new clips.
Inspect the general condition of the parking brake shoes, springs and backing plate. Rectify as necessary.
- Remove the parking brake shoes from the backing plate (see TOPIx Workshop Manual section 206-05: Parking Brake and Actuation - Removal and Installation - Parking Brake Shoes).
- Inspect the parking brake shoes and general condition of the springs and clips.
- The linings should be a minimum of 2.0 mm thick.
- If there is evidence that the parking brake shoes or other components have been damaged due to heat build-up, install new parking brake shoes (see TOPIx Workshop Manual section 206-05: Parking Brake and Actuation - Removal and Installation - Parking Brake Shoes).
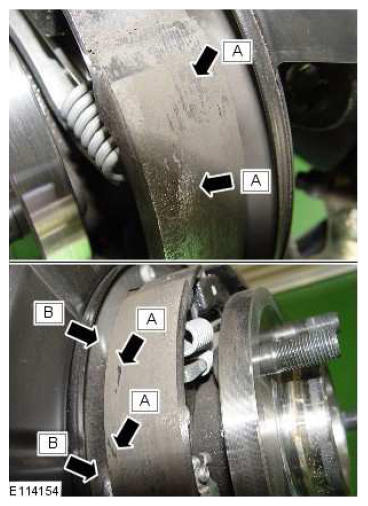
- Remove any build-up of brake dust from the parking brake drum and drum/shoe interface. Clean the friction surface of the parking brake shoes and remove any metal flakes (detailed as 'A' in the illustration) from the parking brake shoe lining using a suitable tool.
- Remove any build-up of corrosion from the backing plate and brake shoe support platforms (detailed as 'B' in the illustration). These areas should be clean and smooth.
- Protect/lubricate the backing plate brake shoe support platforms using a suitable grease.
- If there are signs of EPB dragging, go to Step 25.
- If there are no signs of EPB dragging, go to Step 32 .
- Check the parking brake cables.
- Inspect for heat damage at the cable ends.
- Check that the brake cables are correctly attached by releasing the outer cable retaining nuts from the backing plates and pulling on the cables.
- The cables should not detach from the brake.
-
NOTE: Damage parking brake cables can be replaced separately and without the Electric Park Brake (EPB) actuator.
Make sure the E-clips are installed to the outer brake cable ends in the correct groove.
- Only if required: replace the left parking brake cable (see TOPIx Workshop Manual section 206-05: Parking Brake and Actuation -Removal and Installation - Left parking brake Cable).
- Only if required: replace the right parking brake cable (see TOPIx Workshop Manual section 206-05: Parking Brake and Actuation -Removal and Installation - Right parking brake Cable).
INSTALL AND ADJUST PARKING BRAKE CABLES
- Install the outer cable retaining nuts.
- Torque: 8 Nm
- Install the rear brake discs (see TOPIx Workshop Manual section 206-04: Rear Disc Brake - Removal and installation - Brake Disc).
- Install the EPB 30 Amp fuse 'LINK FL8' to the BJB.
-
CAUTION: Read this procedure BEFORE adjusting the parking brake shoe clearance; follow it closely.
Complete the parking brake shoe and lining adjustment (see TOPIx Workshop Manual section 206-05: Parking Brake and Actuation - Parking Brake Shoe and Lining Adjustment). - Clear all DTCs from the EPB Module.
CHECK ELECTRIC PARK BRAKE (EPB) ACTUATOR OPERATION
- Start the engine and select transmission gear position Neutral (N) and transfer case Low (L) range.
-
NOTE: If the repair is successful, there will be no abnormal loud screeching noises coming from the EPB actuator while performing this Step. If there are abnormal screeching noises, the EPB actuator may have suffered internal damage and will have to be replaced. This procedure is to be carried out as a separate claim.
Apply and release the parking brake 3 times.
-
NOTE: If any DTCs have been logged, further investigation is required into possible causes of these DTCs (see TOPIx Workshop Manual section 206-05: Parking Brake and Actuation - Diagnosis and Testing - parking brake).
Check for DTCs in the EPB module.
- If no DTCs are stored, the EPB red warning lamp is not flashing, and the EPB operation is normal, go to Step 35.
- If DTCs are stored, the EPB red warning lamp is flashing, and/or EPB operation is not normal, further diagnosis will be necessary. To be performed as a separate claim.
- Exit the current session.
- Select the Session tab.
- Select the Close Session option.
- Disconnect the diagnostic tool and battery power supply from the vehicle.