Air Suspension Compressor Replacement (LTB00420NAS2)
Reference number: LTB00420NAS2
AIR SUSPENSION COMPRESSOR REPLACEMENT
TECHNICAL SERVICE BULLETIN
| LAND ROVER: | 2005 - 2009 LR3 (LA); 2010 - 2012 LR4 (LA); 2006 - 2013 Range Rover Sport (LS) |
| SECTION: | 204-05 |
| AFFECTED VEHICLES: | LR3 (LA) VIN: 5A000360 - 9A513325 Model Year: 2005 - 2009; LR4 (LA) VIN: AA510742 - CA638964 Model Year: 2010 - 2012; Range Rover Sport (LS) VIN: 6A900129 - 7A999999; 7A100000 - BA299999; BA700000 - DA768550 Model Year: 2006 - 2013 |
CONDITION SUMMARY
- Hitachi:
- LR3: 5A000360 - 9A513325
- Range Rover Sport: 6A900129 - 7A999999; 7A100000 - 9A215622
- 'Old-design' AMK
- LR4: AA510742 - CA638964
- Range Rover Sport: AA212147 - DA768550
Situation: The Air suspension warning lamp may be illuminated, the air suspension may fail to raise the vehicle, and Diagnostic Trouble Code (DTC) C1A20-64 may be stored. Vehicles within the above VIN ranges have been fitted with either a Hitachi or 'old-design' AMK air suspension compressor.
Cause: This may be caused by a faulty air suspension compressor.
Action: In the event of a customer concern where a Hitachi air suspension compressor must be replaced, refer to the REPAIR PROCEDURE outlined below.
PARTS
| LR044360 | AMK air compressor replacement kit | Qty: 1 |
TOOLS
IDS with latest IDS-DVD and Calibration File; first available on DVD131.07 v.118
Land Rover-approved Midtronics Vehicle Power Supply
Refer to Workshop Manual for any required special tools
WARRANTY
DDW requires the use of causal part numbers. Labor only claims must show the causal part number with a quantity of zero.
| DESCRIPTION | SRO | TIME (HOURS) | CONDITION CODE | CAUSAL PART |
|---|---|---|---|---|
| Air suspension compressor - replace Hitachi with AMK | 60.50.89/58 | 0.60 | 42 | LR023964 (Hitachi) LR032902 (AMK) |
Normal Warranty policies and procedures apply
REPAIR PROCEDURE
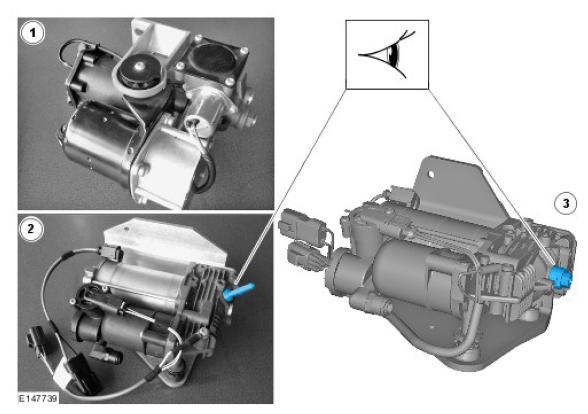
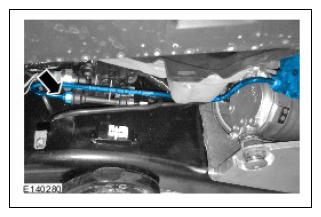
- Identify the air suspension compressor installed on the vehicle.
- If a Hitachi air suspension compressor ((1)) is installed, carry out steps 2 to 19 and 38 to 49.
- If an old-design AMK air suspension compressor ((2)) is installed, carry out steps 20 to 49.
NOTE: STEPS 2-19 FOR VEHICLES EQUIPPED WITH HITACHI AIR SUSPENSION COMPRESSOR ONLY.WARNING: Steps 2 and 3 must be carried out within 10 minutes of each other; failure to follow this instruction may result in personnel injury.CAUTION: Make sure the ignition switch is turned 'OFF', the park brake is 'ON', and the transmission gear selector lever is in 'P' (Park) position. - Open the front door.WARNING: Do not work on or under a vehicle supported only by a jack. Always support the vehicle on safety stands.WARNING: Make sure that at least one wheel is off the ground.
- Refer to Workshop Manual section 100-02 and raise and support the vehicle; make sure at least one of the wheels is off the ground.
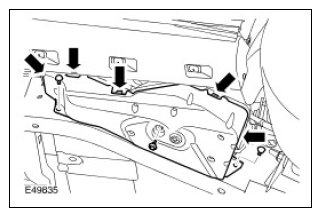
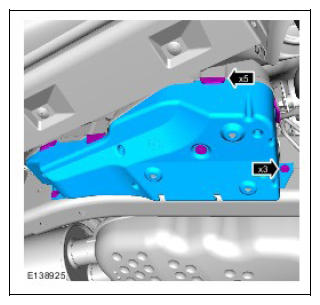
- Remove the air suspension compressor lower cover.
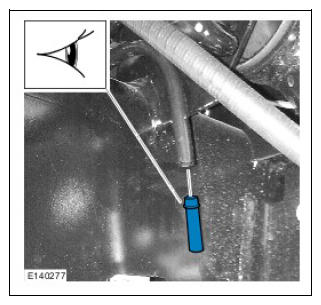
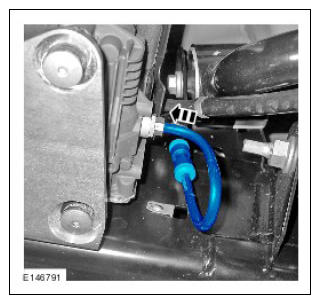
CAUTION: Make sure that the 3 air suspension compressor mounting nuts in the chassis rail are not damaged or corroded. If required, replace the nuts.CAUTION: Always plug any open connections to prevent contamination.NOTE: Access to the top compressor fixing bolt is very restricted. It is advisable to use a 3/8-inch-drive socket with a flexible coupling.
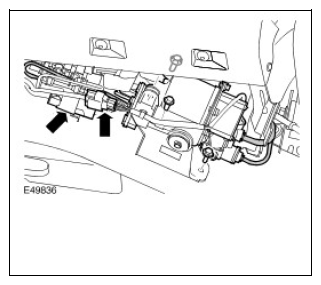
- Remove the air suspension compressor.
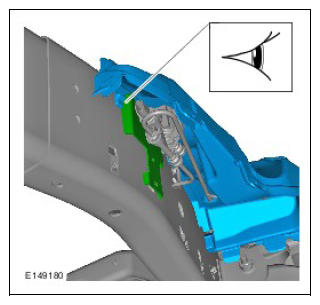
- Remove and discard the old air suspension compressor upper cover.CAUTION: Make sure that the cover is correctly located behind the bracket as shown; failure to follow this instruction may cause noise/vibration issues.
- Install the new air suspension compressor upper cover.CAUTION: Make sure the new pipe is fitted securely into the new air suspension compressor connector; failure to follow this instruction may cause damage to the component.NOTE: Old-design AMK air suspension compressor shown; new-design AMK air suspension similar.
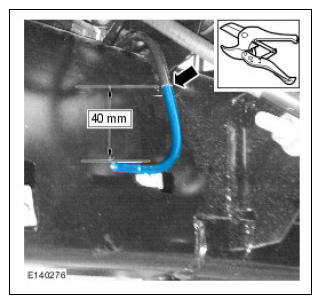
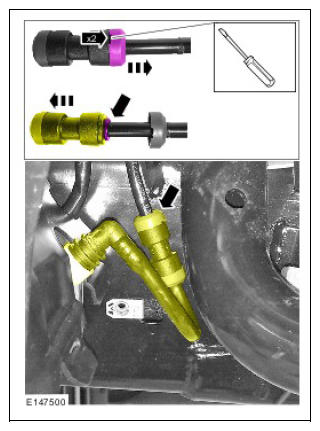
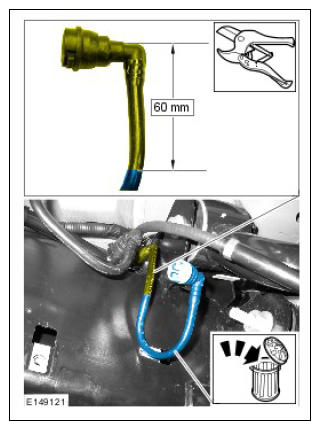
- Install the new exhaust pipe to the new air suspension compressor as shown.NOTE: The pipe to be cut is the smaller diameter pipe.
- Using a suitable pipe cutter tool, cut the air suspension feed pipe in the position indicated.CAUTION: Make sure the air line insert is in the correct orientation; failure to follow this instruction may cause damage to the component.
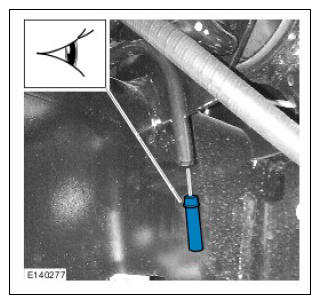
- Install the air line insert until there is no part of the air line insert showing, and it is flush with the end of the air line.
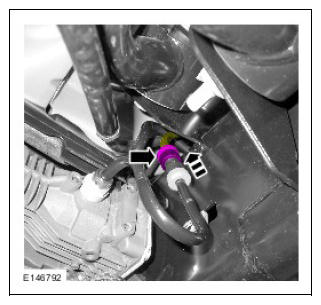
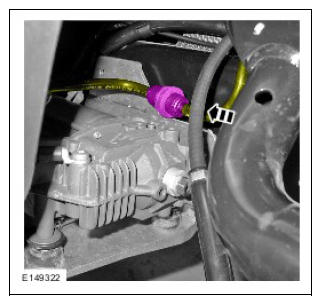
- Remove and discard the air line and connector from the valve block.CAUTION: Do not remove the blanking plug until after the connector is tightened.
- Install new connector and tighten to 2Nm.
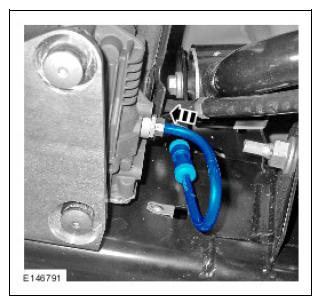
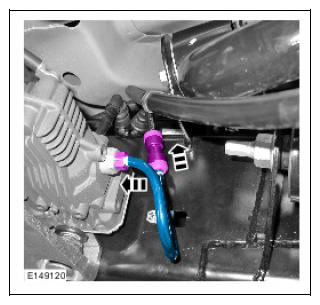
CAUTION: Make sure the air line link pipe is correctly fitted. It must be inserted to a depth of 20mm.CAUTION: Make sure the air lines and wiring are not trapped between the Air Compressor mounting bracket and the chassis; failure to follow this instruction may cause damage to the vehicle.
- Position the new air suspension compressor using the new mounting bolts (do not tighten the bolts fully) and install the new air line link pipe.
- Connect the new air line link pipe.
- Install the new air line link pipe.CAUTION: Make sure the air lines and wiring are not trapped between the air suspension compressor mounting bracket and the chassis; failure to follow this instruction may cause damage to the vehicle.NOTE: Make sure that the air suspension compressor upper cover is installed correctly.
- Secure the air suspension compressor and bracket assembly.
NOTE: Air suspension compressor upper cover shown removed for clarity.
- Connect the air line.
- Connect the air line and two (2) electrical connectors.
- Install the air suspension compressor lower cover.
NOTE: STEPS 20-37 FOR VEHICLES EQUIPPED WITH OLD-DESIGN AMK AIR SUSPENSION COMPRESSOR ONLY.WARNING: Do not work on or under a vehicle supported only by a jack. Always support the vehicle on safety stands.WARNING: Make sure that at least one wheel is off the ground.
- Refer to Workshop Manual section 100-02 and raise and support the vehicle; make sure at least one of the wheels is off the ground.
- Remove the air suspension compressor lower cover.
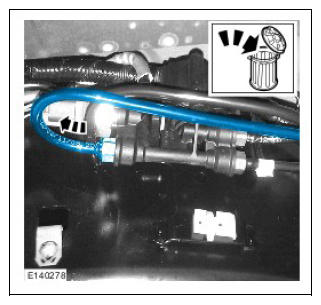
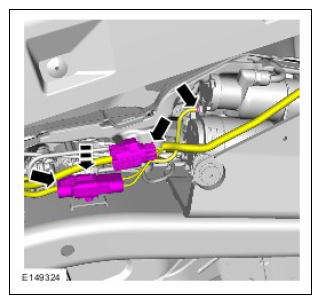
- Disconnect the two (2) air lines.
- If installed, remove and discard the air line link pipe.
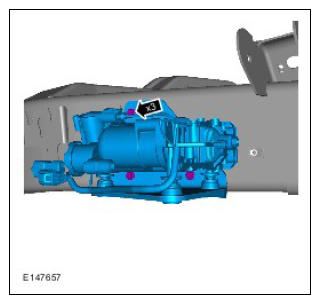
- Disconnect the air line and two (2) electrical connectors.CAUTION: Make sure that the three (3) air suspension compressor mounting nuts in the chassis rail are not damaged or corroded. If required, replace the nuts.NOTE: New-design AMK air suspension compressor shown, old-design AMK air suspension similar.
- Remove the air suspension compressor and bracket assembly.
- Remove and discard the old air suspension compressor upper cover.CAUTION: Make sure that the cover is correctly located behind the bracket as shown; failure to follow this instruction may cause noise/vibration issues.
- Install the new air suspension compressor upper cover.CAUTION: Make sure the air lines and wiring are not trapped between the air suspension compressor mounting bracket and the chassis; failure to follow this instruction may cause damage to the vehicle.NOTE: Make sure that the air suspension compressor upper cover is installed correctly.
- Install the air suspension compressor and bracket assembly.
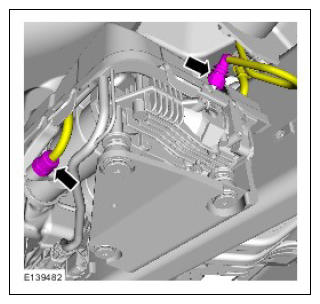
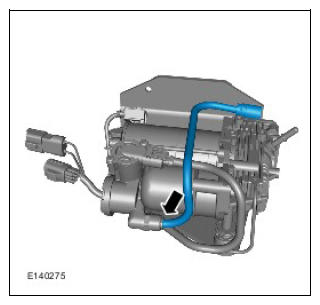
NOTE: Old-design AMK compressor shown; new-design AMK air compressor similar.NOTE: Component shown removed from vehicle for clarity.
- Connect the air line.NOTE: STEPS 30-31 FOR VEHICLES WITH AIR LINK PIPE ONLY.CAUTION: Make sure the air line link pipe is correctly fitted. It must be inserted to a depth of 20mm.
- Install the new air line link pipe.
- Connect the new air line link pipe.NOTE: STEPS 32-34 FOR VEHICLES WITHOUT AIR LINK PIPE ONLY.
- Using a suitable pipe cutter tool, cut the air suspension feed pipe in the position indicated.
CAUTION: Make sure the air line insert is in the correct orientation; failure to follow this instruction may cause damage to the component.
- Install the air line insert until there is no part of the air line insert showing, and it is flush with the end of the air line.
- Install the new air line link pipe.NOTE: ALL VEHICLES.
- Connect the air line and two (2) electrical connectors.NOTE: Air suspension compressor upper cover shown removed for clarity.
- Connect the air line.
- Install the air suspension compressor lower cover.
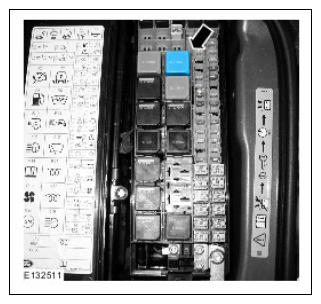
NOTE: STEPS 38-49 FOR ALL VEHICLES.NOTE: Location of air suspension relay to be replaced.
- Replace the compressor relay.
CAUTION: Ensure all ignition 'ON'/ignition 'OFF' requests are carried out; failure to perform these steps may cause damage to control modules in the vehicle.CAUTION: A Land Rover-approved Midtronics Vehicle Power Supply must be connected to the vehicle battery during IDS diagnosis/module programming.
- Connect the Land Rover-approved Midtronics Vehicle Power Supply to the vehicle battery.
- Turn ignition 'ON' (engine not running).NOTE: IDS must be loaded with DVD131.07 v.118 or later.
- Connect the IDS to the vehicle and begin a new Symptom Driven Diagnostics (SDD) session.
- Follow the on-screen prompts, allowing SDD to read the VIN and identify the vehicle.
- From the Session Type selection screen, choose 'Diagnosis'.
- Select the 'Selected Symptoms' tab, and then select:
- 'Service Function
- Select 'continue'.
- Select the 'Recommendations' tab.CAUTION: During this procedure, if SDD presents a question regarding compressor type, always select the type/manufacturer for the compressor being fitted to the vehicle as part of this repair, which under all circumstances should be an AMK compressor type. If unsure select 'EXIT' at this prompt and repeat this process after the facts are known. Failure to make the correct compressor type selection will cause SDD to install incorrect software.
- From the Recommendations tab, select 'Run' to perform the 'Air suspension - Air suspension compressor replacement' function.
- Follow all on-screen instructions to complete this task.
- Exit the current session.
- Disconnect the IDS and the Midtronics Vehicle Power Supply from the vehicle.