Parking Brake Shoe And Lining Adjustment
NOTE:
This procedure must be carried out if, new parking brake shoes are fitted, new rear brake discs are fitted or if the vehicle has been mud wading (not water) for more than 50 miles or if the parking brake is adjusted as part of a vehicle service.
- Check the parking brake for correct operation.
- Using the Land Rover approved diagnostic system, drive the parking brake to the mounting position.
- Raise and support the vehicle.
- Remove the wheels and tires.
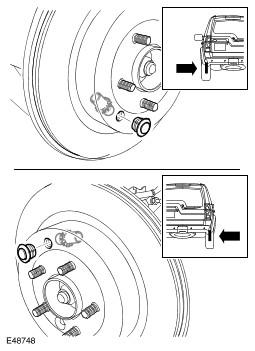
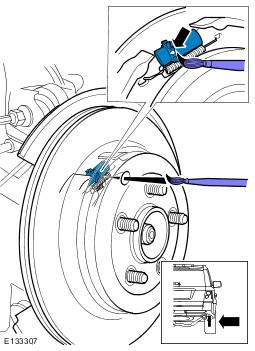
- Locate the parking brake shoe adjuster.
- Remove the access plug.
- Rotate the brake disc.
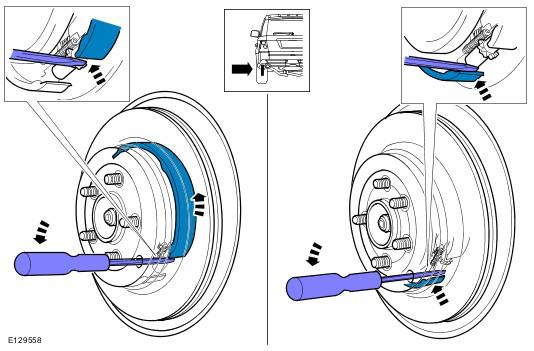
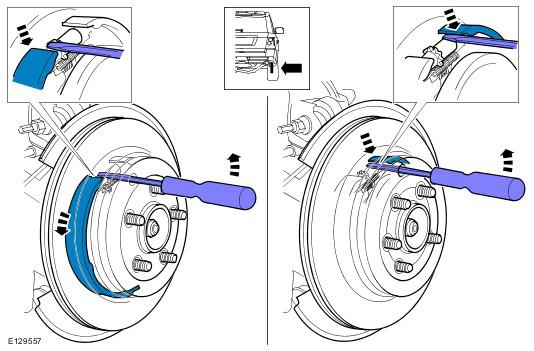
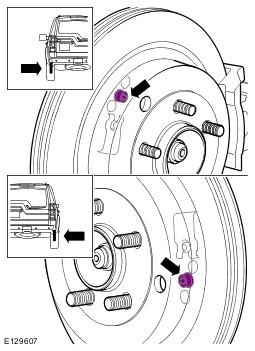
- Using a flat blade screwdriver, lever the brake shoes as indicated.
- Using a flat blade screwdriver, lever the brake shoes as indicated.
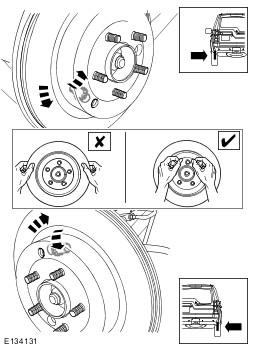
- Using a flat bladed screwdriver rotate the brake shoe adjuster to extend it until the brake disc is locked hand tight.
- Using suitable marker, mark the position of the brake shoe adjuster.
- Rotate the adjuster back one revolution until paint mark is visible.
- Loosen the wedge adjuster Allen screw half a turn.
- Tap the brake disc lightly with a soft faced mallet, around the parking brake shoe location within the brake disc.
- Tighten the wedge adjuster Allen screw to 6 Nm (5 lb.ft).
- Install the access plug.
- Repeat the above procedure for the other side.
- Take the vehicle out of the mounting position by operating the parking brake twice.
- Carry out the parking brake shoe bedding-in procedure. See PARKING BRAKE SHOES BEDDING-IN .
CAUTION:
When the vehicle is in the mounting position a red flashing light may appear on the instrument cluster. This indicates that the parking brake actuator is in the mounting position. It does not indicate a vehicle fault.
CAUTION:
The warning lamp on the instrument cluster will flash whilst the parking brake is being driven into the mounting position.
WARNING:
Do not work on or under a vehicle supported only by a jack. Always support the vehicle on safety stands.
NOTE:
Align the access hole with the indicators located on the back plate.
CAUTION:
Failure to follow this step may cause damage to the parking brake system. Failure to displace the parking brake shoes, as shown, will result in incorrect clearance when carrying out the adjustment step.
NOTE:
The movement of the parking brake shoe will be small and may not be felt when levering.
NOTE:
LH shown.
CAUTION:
Failure to follow this step may cause damage to the parking brake system. Failure to displace the parking brake shoes, as shown, will result in incorrect clearance when carrying out the adjustment step.
NOTE:
The movement of the parking brake shoe will be small and may not be felt when levering.
NOTE:
RH Shown.
CAUTION:
Do dot apply excessive force on the brake shoe adjuster. Failure to follow this instruction may result in damage to the parking brake system
CAUTION:
The following steps sets the running clearance for the parking brake shoes, failure to adhere to the paint marking process may cause damage to the park brake system when the adjustment steps are carried out.
CAUTION:
The parking brake adjuster must be rotated back EXACTLY one full revolution. Failure to follow this instruction may result in damage to the parking brake system.
CAUTION:
The wedge adjuster must be correctly seated to make sure the parking brake cable is correctly adjusted. Failure to follow this instruction may result in damage to the parking brake system.
CAUTION:
The next step should only be carried out when new parking brake shoes or brake disc have been installed.