Rear HALFSHAFT: Installation
- Clean the components.
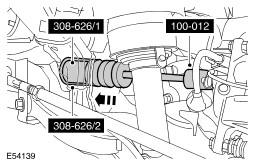
- Using the special tools, install a new halfshaft oil seal.
- The halfshaft oil seal protector must be left in place, until the halfshaft is fully installed.
- With assistance, install the halfshaft.
- Install the snap ring.
- Open the halfshaft oil seal protector.
- Make sure the snap ring is fully engaged and retains the halfshaft.
- Remove and discard the halfshaft oil seal protector.
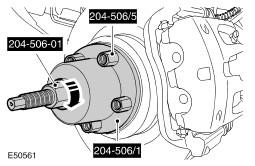
- Using the special tools, install the halfshaft in the wheel hub.
- Connect the lower arm to the wheel knuckle.
- Tighten to 275 Nm (203 lb.ft).
- Tighten the new nut to 275 Nm (203 lb.ft).
- Install a new halfshaft retaining nut and lightly tighten.
- Connect the toe link.
- Tighten the bolt to 175 Nm (129 lb.ft).
- Secure the parking brake cable to the lower arm.
- Install the stabilizer bar link. Refer to Stabilizer Bar Link .
- Tighten the new halfshaft retaining nut to 350 Nm (258 lb.ft).
- Stake the nut to the halfshaft.
- Install the wheel and tire.
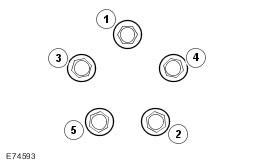
- Tighten the wheel nuts in the sequence shown:
- Stage 1: 4 Nm
- Stage 2: 70 Nm
- Stage 3: 140 Nm
- Tighten the wheel nuts in the sequence shown:
- Fill the differential with the correct amount of lubricant. Refer to Differential Draining and Filling .
NOTE:
The oil seal protector is designed to break into two pieces.

CAUTION:
Make sure the ball joint seal is not damaged. A damaged seal will lead to the premature failure of the joint.
CAUTION:
Install the halfshaft nut finger tight.
CAUTION:
Do not use air tools to install the nut. Failure to follow this instruction may result in damage to the component.
CAUTION:
Do not fill the differential with lubricant up to the filler plug. The filler plug is only used to fill the differential with lubricant, and not to act as a level indicator.