Front HALFSHAFT LH: Installation
- Clean the components.
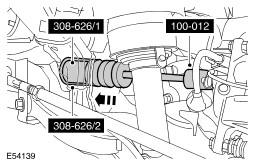
- Using the special tools, install a new halfshaft oil seal.
- The halfshaft oil seal protector must be left in place, until the halfshaft is fully installed.
- Install the halfshaft.
- Install the snap ring.
- Lubricate the seal and the bearing running surfaces with clean axle oil.
- Make sure the snap ring is fully engaged and retains the halfshaft.
- Open the halfshaft oil seal protector.
- Remove and discard the halfshaft oil seal protector.
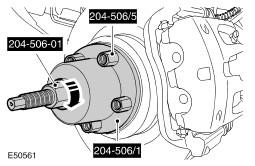
- Using the special tools, install the halfshaft in the wheel hub.
- Connect the upper arm and wheel knuckle.
- Install a new nut and tighten to 70 Nm (52 lb.ft).
- Secure the stabilizer bar link.
- Install a new nut and tighten to 115 Nm (85 lb.ft).
- Connect the tie-rod end ball joint.
- Install a new nut and tighten to 76 Nm (56 lb.ft).
- Install a new halfshaft retaining nut and lightly tighten.
- Secure the brake hose retaining bracket to the wheel knuckle.
- Tighten the bolt to 22 Nm (16 lb.ft).
- Secure the RH stabilizer link.
- Install a new nut and tighten to 115 Nm (85 lb.ft).
- Tighten the new halfshaft retaining nut to 230 Nm (170 lb.ft).
- Stake the nut to the halfshaft.
- Install the wheels and tires.
- Tighten the wheel nuts to 140 Nm (103 lb.ft).
- Fill the differential with the correct amount of lubricant. Refer to Differential Draining and Filling article.
NOTE:
Do not fully engage the halfshaft until the oil seal protector has been removed.
NOTE:
The oil seal protector is designed to break into two pieces.

CAUTION:
The lower arm ball joint can be damaged by excessive articulation. The wheel knuckle must be fully supported at all times. Do not allow the wheel knuckle to hang on the lower arm. Failure to follow this instruction will result in damage to vehicle.
CAUTION:
Install the halfshaft nut finger tight.
CAUTION:
Do not use air tools to install the nut. Failure to follow this instruction may result in damage to the component.
CAUTION:
Do not fill the differential with lubricant up to the filler plug. The filler plug is only used to fill the differential with lubricant, and not to act as a level indicator.