Axle Assembly: Installation
- With assistance, install the rear axle assembly.
- Tighten the front mounting bolt to 275 Nm (203 lb.ft).
- Tighten the rear mounting bolts to 175 Nm (129 lb.ft).
- Connect the breather line.
- Vehicles with differential locking motor: Connect the electrical connectors.
- Secure the wiring harness clips.
- Secure the driveshaft to the rear axle drive flange.
- Clean the component mating faces.
- Tighten the bolts to 150 Nm (110 lb.ft).
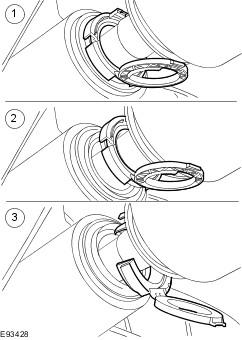
- Install a new snap ring to the LH halfshaft.
- Secure the LH halfshaft in the axle assembly.
- Open the halfshaft seal protector and install the halfshaft.
- Release the halfshaft seal protector from the halfshaft seal.
- Remove the halfshaft seal protector.
- Fully install the halfshaft.
- Make sure the snap ring is fully engaged and retains the halfshaft.
- Secure the LH rear wheel knuckle to the lower arm.
- Tighten the nut and bolt to 275 Nm (203 lb.ft).
- Secure the LH rear toe link.
- Tighten the bolt to 175 Nm (129 lb.ft).
- Secure the parking brake cable to the LH lower arm.
- Install the LH rear stabilizer bar link.
- Tighten the nuts to 115 Nm (85 lb.ft).
- Install the RH rear halfshaft. Refer to Rear Halfshaft article.
- Fill the differential with fluid. See Differential Draining and Filling .
- Install the muffler assembly. Refer to REAR MUFFLER
- Install the wheels and tires.
- Tighten the wheel nuts to 140 Nm (103 lb.ft).
NOTE:
Install new bolts.
NOTE:
Do not fully engage the halfshaft until the oil seal protector has been removed.
CAUTION:
Make sure the ball joint seal is not damaged. A damaged seal will lead to the premature failure of the joint.
NOTE:
Install new nuts.