Evaporative Leak OBD Fault Rectification Guide
Determine Which DTC Has Been Stored
Using the manufacturer approved diagnostic system, choose diagnostic session , then choose the following symptom paths : Powertrain/engine system/fuel vapor and odor, Powertrain/engine system/fuel tank, Electrical/instruments/warning lamps/engine malfunction lamp/lamp illuminated, Powertrain/engine system/engine performance/fuel consumption high
| DTC | Description |
|---|---|
| P0442-00 | DMTL small leak |
| P0447-00 | DMTL COV electrical low (open) |
| P0448-00 | DMTL COV electrical high |
| P0455-00 | DMTL rough leak |
| P2401-00 | DMTL pump electrical low (open) |
| P2402-00 | DMTL pump electrical high |
| P2404-2F | DMTL noise fault |
| P2404-29 | DMTL reference leak |
| P2405-00 | DMTL reference current low |
| P2406-00 | DMTL reference current high |
| P2450-00 | DMTL COV stuck open |
| P2451-00 | DMTL COV stuck closed |
| P240B-00 | DMTL heater electrical low (open) |
| P240C-00 | DMTL heater electrical high |
Attempt To Replicate The Fault Using The "Fuel Leak Check" Forced Test
- Record any DTCs that has been logged
- Using the manufacturer approved diagnostic system, in the Recommendations tab run the Fuel Leak Check forced test
- For the test to run the fuel level must be between 15% and 85%
- During this procedure the engine must be off
- The possible responses from the test and the associated DTCs are listed below
- If again no fault is found it could suggest that the failure mode is a borderline condition (refer to section 3) or that it was caused by incorrect fitment of the fuel cap or the fuel filler neck is at fault therefore it is important not disturb the fuel cap
- Disconnect purge pipe from the purge valve, observe the condition of connection (the seating and condition of the "O" ring) and then reconnect. Using the manufacturer approved diagnostic system, run Purge Valve Self Test (to clean the purge valve) then run the Fuel Leak Check
- If the test failed, a smoke test is required to determine the cause of the leakNOTE: P240B & P240C are not included in the Fuel Leak Check forced test (these monitors run at every ignition on and complete within 30 seconds)
Response Description ID Equivalent DTC Function running: Reference leak measurement 1 Function running: Rough leak measurement 2 Function running: Small leak measurement 3 Function running: 2nd ref leak measurement 4 Function running: COV Cleaning 5 Function aborted due to conditions: Vbatt conditions not correct (too high/ low) 11 Function aborted due to conditions: Variation Ref. I (reference current) too high 12 P2404-29 Function aborted due to conditions: DMTL electrical fault 13 P0447, P0448 Function aborted due to conditions: Maximum diagnostic time exceeded 14 Function aborted due to conditions: Crash detected 15 Function aborted due to conditions: Refuel detected 20 Function aborted due to conditions: Filler cap opened 21 Function aborted due to conditions: Engine start 23 Function aborted due to conditions: Noisy current measurement 24 P2404-2F Function aborted due to conditions: Ambient temp outside range 26 Function aborted due to conditions: Ambient pressure outside range 27 Function aborted due to conditions: Other conditions 29 Function complete - Tight system, fault free 30 Function complete - Fine leak detected 31 P0442 Function complete - Rough leak detected 32 P0455 Function complete - Module error 33 P2401, P2402, P2450, P2451, P2405, P2406, P2404-29 Function complete - Medium leak detected 34 P0442, P0455 Read The "Ranking values" To Determine How Far Away The Result Is From The Failure Threshold
- When the Fuel Leak Check forced test has completed the test results (known as ranking values) will be displayed
- These should be compared against the limits shown in the table below
- If the test result is borderline then there is a risk that a failure will occur at a later date (during customer usage of the vehicle)
- To avoid this the vehicle should be carefully checked for any small leaks
| Ranking Value | Normal Result For Tight System | Leak Failure Condition |
|---|---|---|
| Rough Leak (40 thou+) | 0 > = 50 | >= 128 |
| Small Leak (20 thou+) | 0 > = 60 | >= 128 |
TRACE THE ROOT CAUSE OF THE FAULT
The list below provides some suggested actions to help trace the root cause of the fault
Each action should be followed up with a Fuel Leak Check forced test (and ranking value check) in order to determine if any improvement has been made
| DTC | Fault Description | Fault Rectification Actions after smoke test |
|---|---|---|
| P0442-00 | DMTL small leak |
|
| P0447-00 | DMTL COV electrical low (open) |
|
| P0448-00 | DMTL COV electrical high |
|
| P0455-00 | DMTL rough leak |
|
| P2401-00 | DMTL pump electrical low (open) |
|
| P2402-00 | DMTL pump electrical high |
|
| P2404-2F | DMTL noise fault |
|
| P2404-29 | DMTL reference leak |
|
| P2405-00 | DMTL reference current low |
|
| P2406-00 | DMTL reference current high |
|
| P2450-00 | DMTL COV stuck open |
|
| P2451-00 | DMTL COV stuck close |
|
| P240B-00 | DMTL heater electrical low (open) |
|
| P240C-00 | DMTL heater electrical high |
|
Pre and 10MY Denso/Bosch PCM Systems
- 1. Remove rear wheel arch liner to access fuel filler neck
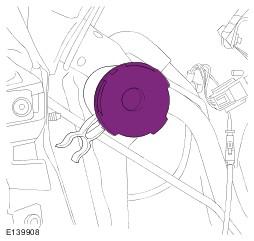
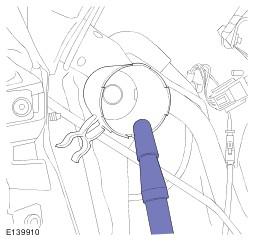
- 2. On the fuel filler neck the DMTL filter will be visible as shown in picture. Unclip filter housing from fuel filler neck to gain better access to DMTL filter
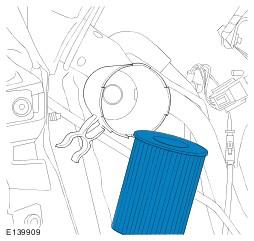
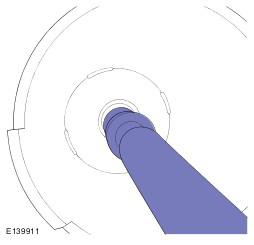
- 3. Remove carefully the top of filter to expose filter and remove
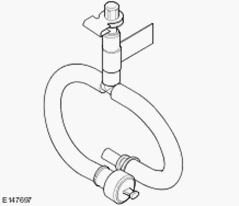
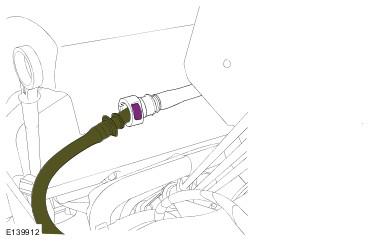
- 4. Attach rubber adapter to tip of smoke machine nozzle to ensure tight seal to filter housing. Disconnect the purge pipe from purge valve; this will be an escape point for the smoke to exit
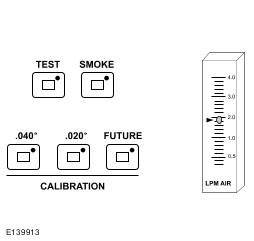
- 5. Allow tester to complete self-test and green READY light to turn ON 2. For best Tester performance; completely unwind Tester's supply hose
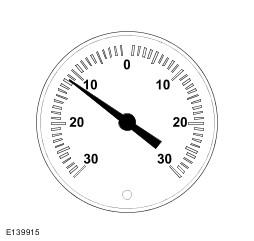
- 6. Press Smoke on control panel to fill EVAP system with smoke vapor. The control panel Smoke light will light indicating smoke production. The smoke setting is on a 15 minute timer. Pressing the Smoke button again turns Tester off. It is normal for the flow meter ball, while in the smoke mode, not to be as steady as when it is in the Test mode. Note: The pressure gauge is active only after smoke cycle is complete
- 7. Continue introducing smoke into the EVAP System until the flow meter's ball stops descending and this assures the system test pressure is met and smoke will appear from the purge pipe, then close off purge pipe with special tool (Test Adapter Hose/EVAP Port 310-142)
Pre 10MY Vehicles
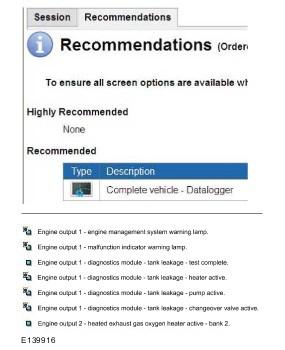
On pre 10MY DMTL systems, Using the manufacturer approved diagnostic system, select Measurement application session then select the Recommendations tab which will give you access to Datalogger . Then select Engine systems then select the Output state control data-logger signal Engine output 1 - diagnostic module - tank leakage -change over valve active which will close the system. Then select Engine output 1 - diagnostic module - tank leakage - pump active this will pressurize the EVAP system
10MY vehicles
On 10MY vehicles a smoke test application is available so therefore only smoke fill the system and then run the application
- 8. Follow the EVAP system path with the halogen light provided and looks for the smoke exiting the leak(s) or use the UV light provided and look for the dye deposited at the exact location of the leak(s)
- 9. Repair the leak(s) and perform the Fuel Leak Check application again or smoke test to verify repair, as well as to make sure there are no additional leaks in the EVAP system
The UltraTraceUV® smoke solution's dye feature is especially helpful when the leak is in an area that is not readily visible, as on the top of the fuel tank or behind a panel. Once you gain access to the area of the leak, wear the yellow UV glasses and shine the UV light provided to identify the exact location of the leak(s). Smoke exiting a very small leak is even easier to see with lower pressure. If you encounter smoke leaking out of an area but find it difficult to pinpoint exactly where the source of the leak is; try reducing the pressure in the system being tested by turning the Tester OFF and allow the pressure to dissipate. The longer a particular leak is allowed to leak, the more fluorescent dye material will be deposited at that leak. With some vapor system leaks, the leak may only present itself under vacuum and not under pressure. If equipment permits, test the system in both states. Purge valve faults [P0441, P0444, P0458 and P0459] should all inhibit DMTL leak test and therefore need to be resolved prior to any DMTL issues. For this reason, when smoke testing the vapor system, it should be sufficient to enter the system at the connection up stream of the purge valve. If no leak is found then testing the remainder of the system up to the purge valve is recommended
Phase-One - (quantifying the leak)
- 1. Connect the tester supply hose to vehicle EVAP system. > Refer to appropriate vehicle application
- 2. Determine if the vehicle's EVAP system you are testing is governed by a.020" (0.5 mm) or.040" (1 mm) acceptable leak standard. Press the appropriate calibration standard on the tester's control panel and observe the position of the flow meter ball. > This function automatically turns off in 10 seconds
- 3. Position the flow meter's pointer flag so that it aligns with the measurement observed in step 2 above. > This sets PASS / FAIL mark
- 4. Close vehicle's EVAP Vent Solenoid. > Refer to appropriate vehicle application
- 5. Press TEST on control panel and fill EVAP system. > This introduces 5-minutes of nitrogen gas
- 6. Look for flow meter ball to stop descending indicating that the vehicle system is full. > Fill time 1-4 minutes depending on system volume
- 7. Compare flow meter ball reading to pointer flag. > ABOVE flag = FAIL (go to Phase-Two). > BELOW flag = PASS (test complete)
Testing With Pressure and Vacuum Decay
In addition to quantifying the leak with the Phase-One flow test, the Tester allows you the flexibility of testing the vehicle's EVAP system by using either Pressure Decay or Vacuum Decay methods. Below are instructions for performing both decay tests
Pressure-Decay Test
At the completion of the Phase-one flow test, the EVAP system is fully pressurized, since the Phase-one test uses pressure to perform its flow test. Testing pressure decay with the Vacutec® 522B-J/LR is very simple. All you need to do is the following:
- 1. Allow tester to complete self-test and green READY light to turn ON
- 2. Connect Tester supply hose to vehicle EVAP system
- 3. Close vehicle's EVAP Vent solenoid > Refer to appropriate vehicle application
- 4. Press VACUUM
switch on the tester control panel
NOTE: The vacuum switch is on a 30-second timer, which should be sufficient time to draw the appropriate vacuum from the EVAP system. Press VACUUM switch again if additional time is required
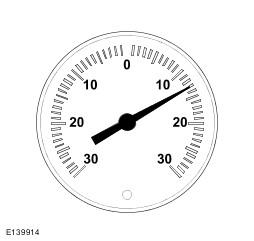
- 5. After vacuum timer turns off, observe the vacuum gauge for any decay (loss of vacuum) indicating a leak in the EVAP system